Saturday, April 30, 2011

All Amp'ed Up

Its been a while since my last post mainly because I have done nothing but small things and waiting on shipments from ebay.

Finally I was able to hook up my amp and one of my subs.


For those who dont know, I am going to have two different subs for two different occasions. The one that I installed today is the compact sub and box, this is the one well use when we need the trunk space. Ill show off the other one once I get the rest of the equipment for that one.

This sub is a 12" Polk Audo DXi124SVC (I believe) Its 4 ohm independent and its very decent for my small box, not really sure though if im going to keep it or return it! Im contemplating getting an excellent BOSS Phantom 12" DVC sub. While Im no big fan of BOSS, this particular speaker is their top of the line model and for about 60 bucks its the same price as the polk currently in the car. So we shall see.

For my larger Ported enclosure I should have a 12" Pioneer Championship Pro Series Sub. A very high quality sub indeed. But me and the seller are having issue its seems so I might have to pick a different speaker from them if they give me a decent deal on it.

My Amp is an Audiopipe Class D. Its capable of 1500 RMS at 1 ohm and 1000 at 2 ohms. Currently Its wired up as a 4 ohm to this particular speaker because its a SVC. With the big system It'll be wired to 2ohms, possibly 1 ohm if I decide to use two.

Of course what good is using a amp and sub if its not wired! So I had to install an aftermarket head unit (radio) and run wires.

The wires I had to run was a 4 Gauge Amp Power Wire, From battery, through fuse, through firewall and ran along the car trim to the amp. Then there was the RCA and Remote Wire from the head unit to the amp  along the trim. Then there was the gain knob ran from the amp to the drivers seat. And you cant forget the Ground wire!


In these photos you can see where I removed the old head unit, in the next two you see where I removed the trim under the back seats and ran the wire underneath them, then put the trim back on to give it a more professional appearance. Its very important to note the ground wire in the last photo. First of all I chose this central location as where the wires would go so incase I went to a show and took out the back seats I could push the sub and amp back towards the front and have long enough wires. The ground wire is black, I had to first find a good spot, and what better spot than right above the gas tank!

Honestly theres no way I was close to drilling into it as theres tons of metal inbetween them, but this spot I chose is perfect. When running the ground wire you have to remember to sand around the area down to the bare shiney metal, because you want a great connection for the ground so you dont end up frying your equipment. So I drilled a hole and attached the ground wire from the screw to the amp.

The last thing I did was run the power wire. This was quite difficult as you have to somehow manage to get the power wire through the firewall (the wall that separates the engine compartment and the front cabin in the car. So after realizing that the wiring kit I recieved called for the fuse to be about a foot from where the cable starts I had to stick my fuse under the hood... not really something I prefer but Ive driven around all day and Ive had no issues and it hasnt gotten that hot. From the fuse I managed to get a hole large enough to run the amp power wire through. From there I just ran it along the trim to the amp.


Now afterwards I finished hooking up the radio. Take Note People, Look at how nice and clean my wires are. At the least use wire nuts like the ones above (the blue caps). While wrapping everything in electrical tape will work, you will get a much better connection and it will look better using the caps. For added reliability, you can solder the wires together. Use zip ties if you want to really organize everything but I didnt go that far. I also ran a 3.5 mm cable from the rear of the head unit to a cup holder temporarily until I make a permanent solution. So moral of this paragraph? Dont skimp on your wire quality or the quality of the connections.

So now that everything is hooked up its time to rattle the walls right? WRONG! Unfortunatly all speakers have a break in period. Following this rule will prolong the life of your speaker and give it longer life. So after adjusting all the settings the amp is set just how I want it so that when it comes time to crank it up all I have to do is turn the knob installed at the front of the car.

I am surprised that as strong as this amp is, I havent had any issues with my lights dimming with the bass. So I might not have to upgrade wiring under the hood, but I might anyway later on.


Heres my Pioneer head unit installed and my iPad playing my pandora station trying out everything. Im very happy with the way this sounds. Once the bigger sub comes for the big box ill let everyone know more about that one.

If you have any questions or comments about my install feel free to add a comment below!!

Wednesday, April 20, 2011

Lights, Grilles, And Amps, Oh My!

Today I recieved my new tail lights, Chrome Grille, and my Amp via UPS.

I unboxed these items and quickly added them to my car. The PT Now Officially looks different from every other PT out there. But I'm not done yet by no means...

The first thing I started with was the new tail lights. These are Altezza style Retro lights. They were easy to install as all you have to do is remove one screw and the lights come out.

Wow do these new lights change the look of the car tremendously. They fit almost perfectly and they are pretty good quality for the mere 80 bucks for them. Heres a picture of the lights half and half to see the difference.

From this picture you can clearly see how much changing lights can make your car look brand new or completely different. This is probably the most expensive investment so far in the whole car but by far the most noticable.

Once they were both done you can tell that these lights give it a more modern retro look. And to make things even better today my chrome grille came in the mail. That means two major mods done in just one day! The rear of the car is basically done except for some chrome edging for the lights and the back up lights, as well as some LEDs put into all the lights in the car to give it an even more modern retro appearance. Im also contemplating tinting the reverse lights as they seem so bright compared to the new tail lights. Other than that, the rear of the car is mostly complete.

Now onto the grille.

This grille is chrome plated ABS Plastic. Its very durable and should last quite a while. Coming in at around 80 bucks its almost the same price as the tail lights. But once again, this is probably the most noticable mod to the front of the car so far. It clips onto the original grille as well as uses adhesive, but its not so strong that I would damage my paint removing it.

WOW! Look at the difference. My car now looks like Ive invested so much money into it, but honestly so far Ive put under 500 bucks into it, including repairs. I finished restoring the drivers side headlight which makes the front look so much better but you cant really see it on the camera.

After this was all done me and Emma desided to sit back and relax, fired up the charcoal grill and made some good ol' american pork chops.

Man, Doing all this work myself is helping me build a strong attachment to the car. I look forward to learning much more about it and hopefully be able to do more to it.

Tuesday, April 19, 2011

Stickers Are More Important Than You Think!

Today my new K&N air filter arrived. These are fairly costly but a great upgrade in any car. They never need replaced and are washable as well. I ordered one New in Box (NIB) from eBay. The cost after shipping was around 35 bucks for this particular model. Well today it arrived and lo and behold when I go to replace the air filter it turns out theres already a K&N in it! Now before you say, "You should've looked Dill". Im telling you I did! Remember the part on this blog where I meantion I have no previous mechanical experience? Yeah? Well  see these filters come with stickers that you place on your airbox that say something like, STOP! Do Not Replace! This Is A Lifetime K&N Air Filter! Other than that how am I to know its a K&N filter? So once I got the new one I popped open my airbox and noticed that my new filter and the one currently in the car look alot alike... hmm.. I took it out of the car and on the side of the rubber was a molded K&N Logo. Nonetheless I replaced it so its nice and new looking and I made sure that for the sake of the next guy with this car, I put the sticker on it.

So really today I didnt do anything to the car besides waste 35 bucks. Plus its raining for the next few days.

But never fear, I'm expecting quite a large shipment of items to arrive on my doorstep over the next few days!

Saturday, April 16, 2011

Multifunction Malfunction

Oh happy day, I managed to finish the day without any fires or unexpected failures!

I managed to paint the front and back bumpers and got rid of the fabled 01-03 pt cruiser bumper discoloration issue. This was done by buying a thin plastic tarp from dollar tree and taping up my car all around the bumper. I used duplicolor adhesion promotor and bumper paint from a local auto store. Basically you tape up the car super super good, spray with a decent mist of the promotor, wait like 3 minutes then put a mist of the bumper paint on it. Then wait 10 minutes and coat it better. Use one can of bumper paint on each bumper. Only half a can of adhesion promoter for each bumper.  It was very simple and anyone with a PT (or any car with a faded bumper) should do this as it was a fun project for me and my fiancee! The paint used looks and feels like a natural factory paint. Heres some shots of the car afterwards


If you look under the open door of the back bumper you can see, yup! the multifuntion switch. After installing the foglights and realizing that they stayed on constantly upon putting in a fuse the other day I put it on my schedule of things to do on this busy day. So today I pulled that out and started working on it. Took me a while to find the issue in such a mess and although I had detailed instructions from PT Cruiser Links they werent accompanied by photos so I was in the dark. In the end its fairly an easy job to do and saved me like 50 bucks on ordering a new switch. It was as easy as removing two phillips head screws on the bottom of the steering column and 4 torx screws once the cover was off. So heres a bit of my journey playing with the steering wheel!


After a few years of plastic on plastic rubing the incline becomes worn out as you can see in the photo above as the before. In the after photo you can see I had cut a peice of metal (From the fresh seal of a gerber goodstart can) and glued it to the incline to create an indestructable (I HOPE) peice. Then once I did that I made sure I greased it good like everything else in the switch already was. I put it all together and wonderfully my fog lights worked once I added the fuse that the previous owner had removed to get the foglights to turn off. They now turn on and off. I of course ran into an issue where I couldnt use my turn signals so I had to take it all apart again and fix that but all in all minus time spent staring at the box it only took me about an hour to repair.


In less noteworth accomplishments today I..
finished installing all but one really difficult headlight bulb (Drivers side High Beam)
got a second key fob in the mail and programed it to my car.

I think things can only get better!

Thursday, April 14, 2011

Just Pickin'!

Today is the first day ive really been able to work on the car since purchasing it due to big rain storms. So the first thing I did was hit up the local salvage yard and CHACHING! I hit gold!


Apparently the previous owner of the wrecked 2002 PT Cruiser (Same color as mine) Loved shopping at RaceandStreet because they actually had lots of the items for sale on that site!

SO, I scored..
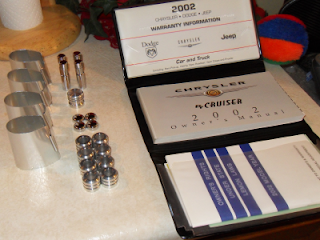
  • Chrome door pulls
  • Chrome thingys for the headrest
  • Chrome radio knob
  • Chrome door handle screw covers
  • Chrome antenna cover
  • Chrome tire screws
  • Chrome steering wheel spoke covers
  • A OEM Shelf/Table for the trunk
  • A very nice condition owners manual complete with original holding case and all warranty paperwork etc (looks great seeing Im missing an owners manual and this thing has all the paperwork that one would expect to come with a new car) and the back shelf.
Looking on ebay thats about 175+ bucks worth of stuff, for how much you ask? 20 bucks! So after washing them all off and shining up all the chrome I installed everything into my car, so easy...


To make things better, in my picture of the trunk you can spy my new head light and fog light bulbs! Ive got atleast one of each installed and these lights have my 100 percent approval! The downfall is that while installing the fog light bulbs I discovered that the fuse for them was missing, so I bought one and installed it and viola! The lights turned on, but... They wouldnt turn off! Even when the car was off the lights stayed on. After doing some research I found out it was the multifunction switch (basically the stick behind the steering wheel that controls all your lights) Something ill have to fix another day! So until then I removed the fuse to prevent battery drainage. So heres my new lights in the box!

Tuesday, April 5, 2011

Theres A First For Everything

Today I went to a local used car lot. Me and my fiancee (Emma) and my little baby boy (Macon) were just glancing around at cars and considering getting rid of our 2004 Pontiac Sunfire. Now this car was truly evil. My fiancee had hit two poles in it plus my grandmother backed into the front drivers side, the brakes were bad and the check engine light was on. So we wanted to get rid of this car before anything worse happened.

We were looking at a Hyundai Elantra and a PT Cruiser when a man approached us, "Excuse me, Is that your sunfire over there?" He asked, pointing to the car. We acknowledged and he said somewhat somberly. "Well I just backed into it! Almost missed it but I got it right on the front passengers side".

At this point we really didnt care. But obviously the man did, as it turned out, he owned the lot. He agreed to give us a hefty trade value for it in return for not reporting it to our insurance.

The typical car buying experience took place after that. With several test drives we finally settled on the PT Cruiser. The main issue was however, that I have no clue how to drive a stick. My fiancee is more than happy to be my personal driver until I can learn so we settled on it.

Currently the vehicle is fully stock. We took it quickly after we bought it and got it checked out at a local meineke. Of course as with most used car dealerships they fixed what you could see and hid what you couldnt see. So since it has 92222 miles on it we will need the timing belt replaced soon as well as the water pump and the drivers side front wheel baring. But for now we got the serpentine belt replaced and some fluids flushed. Cost of that service was only $250. Not bad!

So why start a blog you ask? Simply because I want to document all of my experiences with trying to repair a car with no experience. As well as let others laugh at my attempts to be able to drive a manual transmission. I plan on doing so many things to my vehicle that it only really makes since to put what I do here and occasionally some advice for anyone who would so happen to be just like me.

So in the week since I've had my car ive already done quite alot on it. Ill get you up to date over the next few posts but for now ill leave you with some pictures of my new PT Fresh from the lot.